Keeta Open Delivery API (v.1.0.6)
Special Note:
Keeta Open Delivery API is based on Open Delivery v1.5.0. For basic understanding, please refer to Open Delivery API.
For some of the APIs, Keeta has made some adjustments based on business scenarios. Therefore, when Software Service integrates with Keeta, please refer to the APIs definitions in this document.
The major changes include:- Authentication: The credentials have been changed from the merchant level to the software level, and the token as well. However, software services cannot access the merchant data without the merchant's authorization first.
- Signature: Keeta requires the Software Service to include a signature in the header of every API request. This is to enhance security and prevent the risk of data leakage due to token exposure (such as man-in-the-middle attacks).Please refer to the detailed documentation for the specific signing requirements.
- Merchant Menu: Keeta supports menu push (software services push via POST /merchantUpdate interface) and pull (Keeta pulls via GET /merchant interface); however, Keeta currently only supports full menu updates (modular entry updates are not supported at this time). For details, please refer to the description of the corresponding Merchant endpoints in this document.
- Order: Keeta supports querying order events of batch merchants in the polling endpoint, since the credential is in the software level.
- Fields: Keeta has made some adjustments to the fields in each endpoint, including the number of fields, whether the fields are required, etc. Please refer to the definitions in this document.
- Refund Process: When requesting a total/partial refund after order completion, a negotiation will be initiated between the Customer and the Merchant. This allows the Merchant the opportunity to
ACCEPTorDENYthe Customer's request. For details, refer to ORDERS section. - User Privacy Data: To protect users' personal privacy, Keeta will return encrypted data in order details. In scenarios involving merchant self-delivery or third-party logistics (3PL), this data can be decrypted. If Software Services need to decrypt the data, they must make additional calls to the data decryption endpoint. For details, please refer to the description in the Order section of this document.
We strongly recommend software services to integrate the menu API for data synchronization, to avoid merchants maintaining menus in multiple places.
Keeta provides a self-service authorization feature in its merchant management system . Merchants can log in to the system to independently authorize or revoke access for Software Services. Detailed instructions are available in the relevant documentation section .
In addition, Keeta offers API endpoints that enable Software Services to automate merchant authorization and embed the workflow into their own SaaS software. For implementation details, please refer to the relevant documentation section .
You can Download the Postman Collection and add signature calculation script to the pre-request section in Postman to simplify integration and testing.
Important :You need to replace the secret value in the Postman script with the one assigned to you by Keeta.

For some general instructions, can directly refer to Open Delivery Documents, and relevant links will be attached.
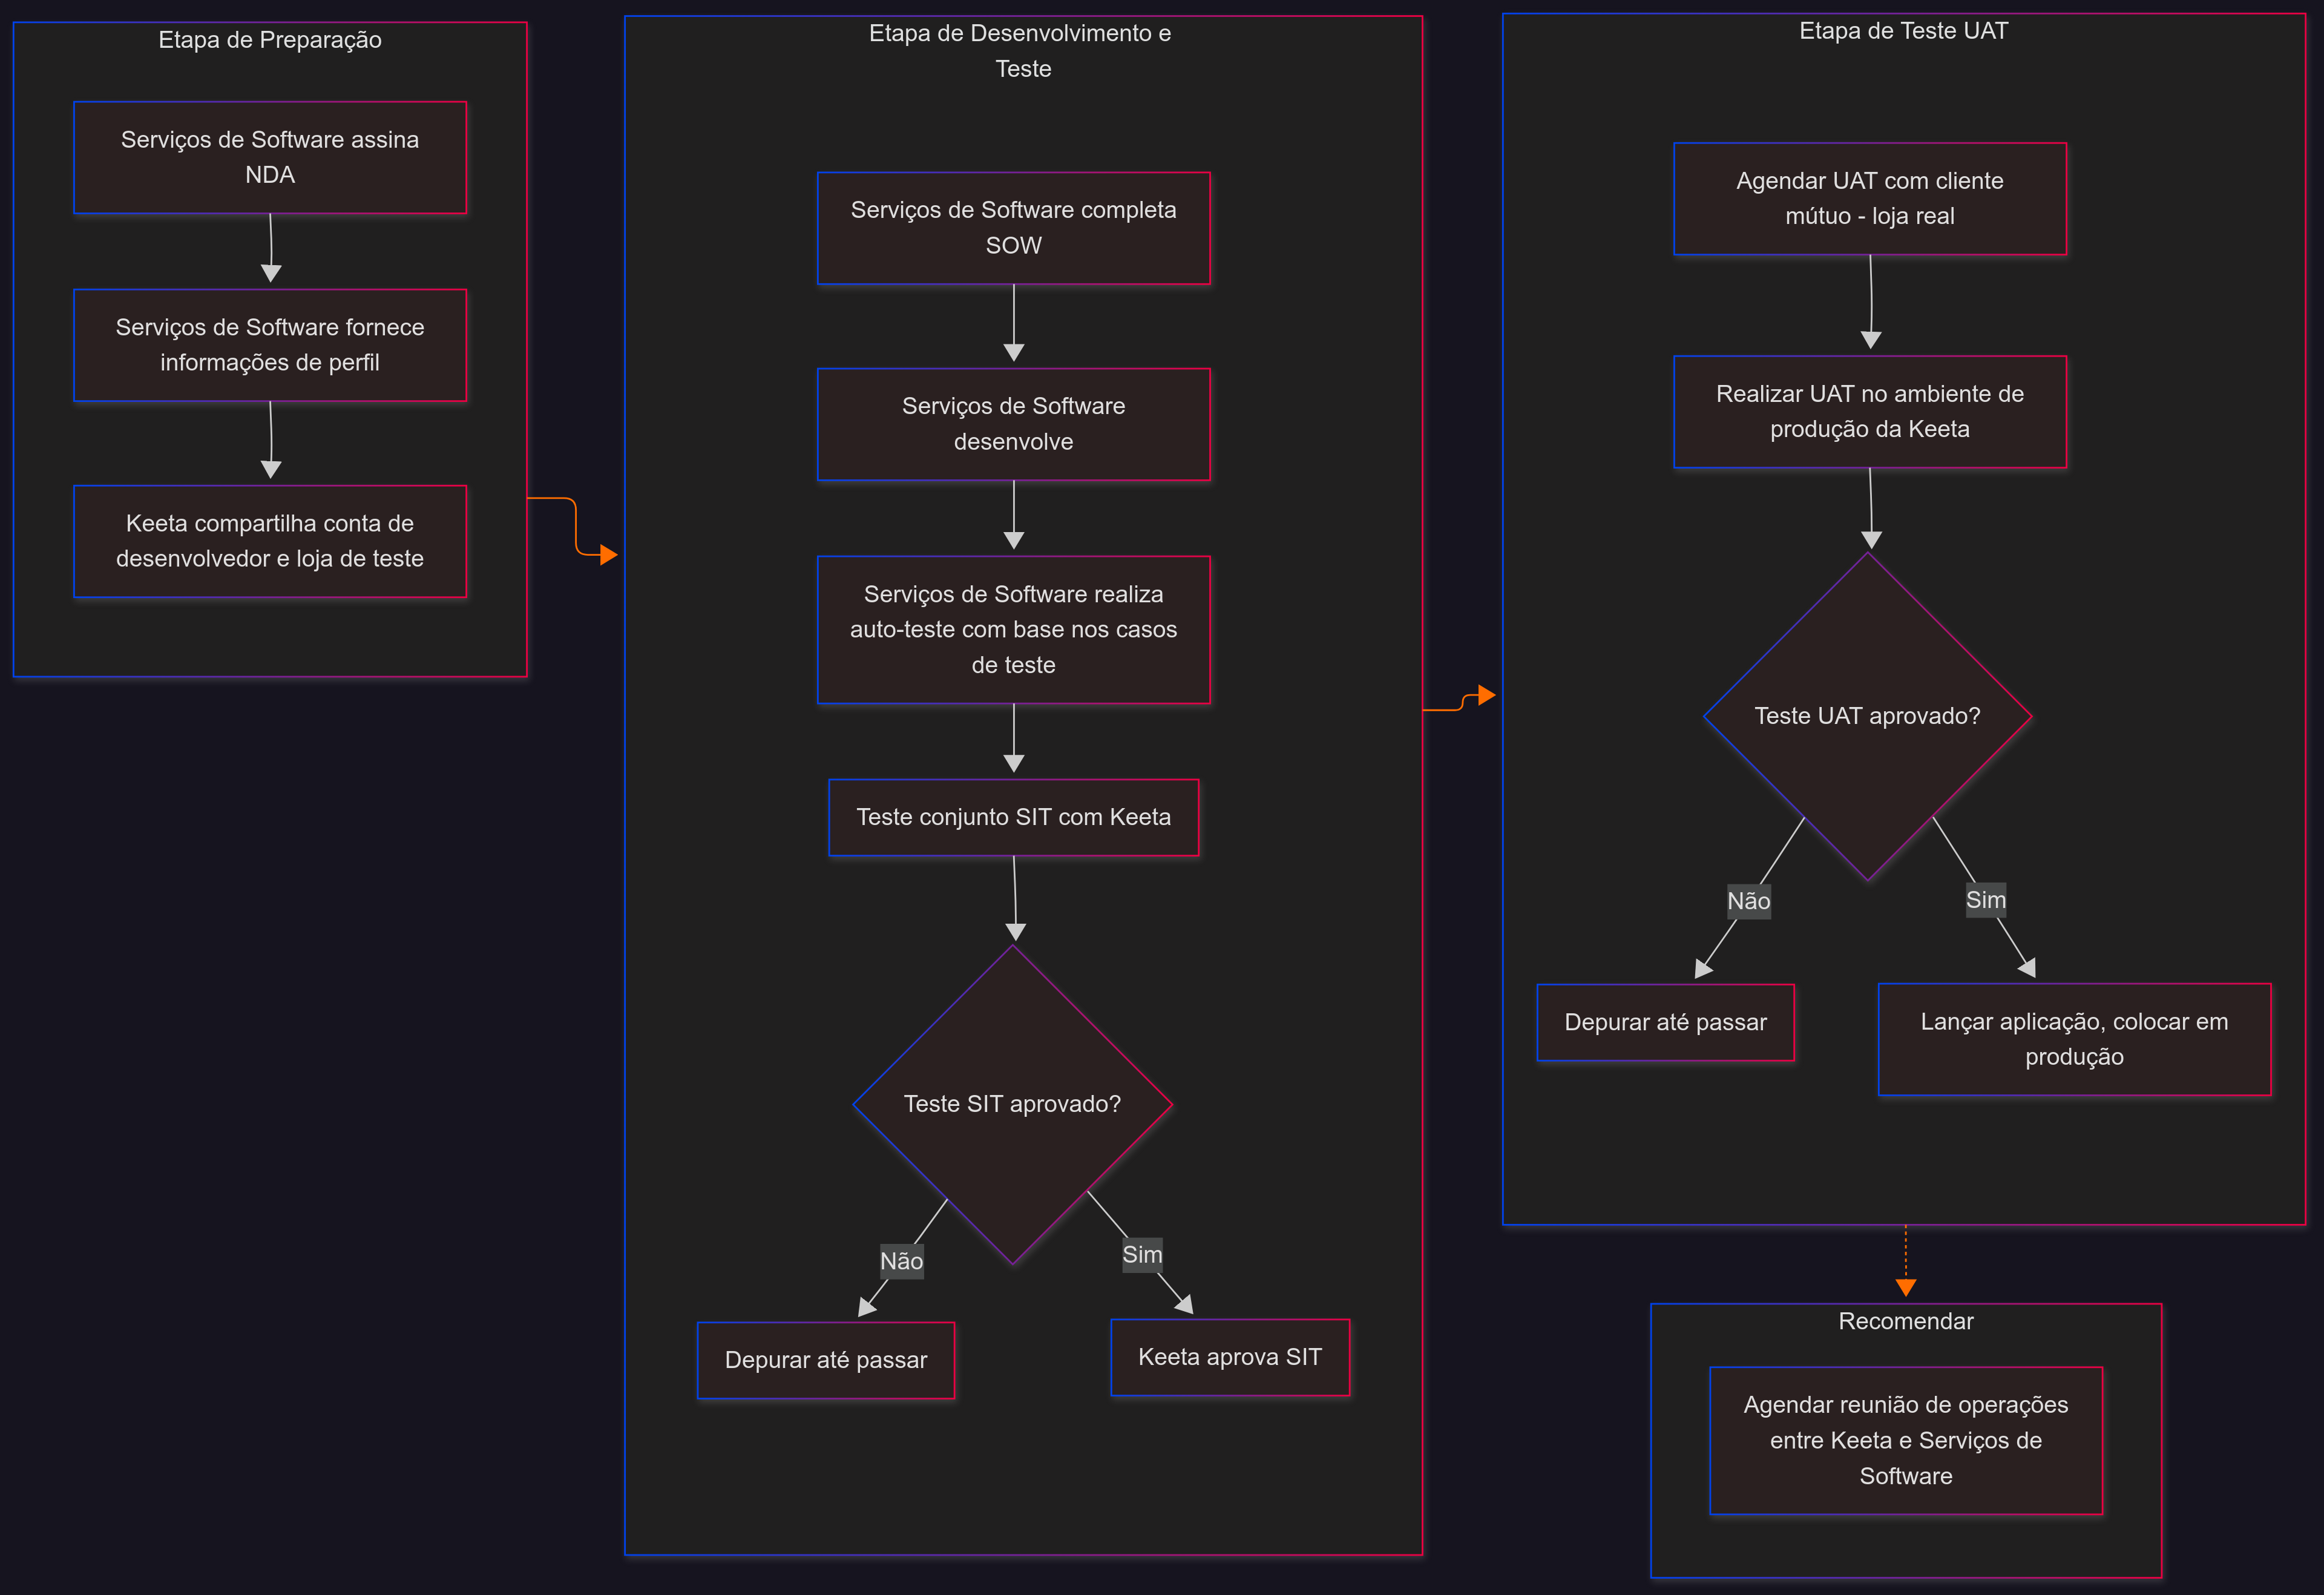
Preparation Phase
NDA
Complete profile information
Set up test store and Keeta test APP
- a. Please log in to the Dev Portal and use the Test Store Tool to create a test store.
- b. During the store creation process, please scan the Keeta App QR code to download the Keeta Test App. Then, register as a Keeta user using your mobile phone number.
- c. Once registration is complete, enter your phone number to link your user account with the test store. After this step, you’ll be able to view your test store within the app.
- d. For instructions on using test store in Keeta test APP, click here .
- e. Once you've created a test store, the credentials will be sent to the primary contact email. You can then use the account to log into the Keeta Merchant Management System , where you'll be able to manage store business hours, basic information, and menus.
Please contact the Keeta team to sign the NDA (Non-disclosure Agreement).
After you have signed the NDA, Keeta API experts will share developer account and test application ID and secret with you. Log in to the Keeta Developer Portal using the developer account we provided. Please complete the profile on the Information Management page of the Dev Portal, including company logo, contact phone number, contact email, and merchant operations email. These details are essential—make sure all information is fully filled out and accurate.
Please note that your company logo will be visible to customers, so ensure it is uploaded correctly. Additionally, Keeta will send the test store credentials and merchant onboarding details to the email addresses listed above — please double-check that they are accurate.
Development Phase
SOW (Statement of Work)
Developer Self-Test
Joint SIT (System Integration Test) with Keeta
Before initiating technical development, please download the SOW file from the Integration Document Management section. Complete the document before the online integration testing (SIT homologation) with Keeta, and upload it to the Dev Portal.
(This file defines the scope of this integration (SOW – Statement of Work) and will help you understand keeta API system).
Please download and review the SIT file, which is a set of self-testing use cases for your reference during internal QA. Keeta team will use the same test cases in the Joint SIT (system integration test) test in the future. We recommend that you follow these test cases to ensure the system functions properly. Please fill in and submit the self-test records before conducting SIT tests with Keeta.
After completing the developer self-test, please schedule an online joint SIT test (homologation) with Keeta. Keeta team will attend to conduct test with you and help resolve issues. If the SIT test meets the requirements, Keeta will sign off the test, and assign an application for the production environment (including the ID and secret) to you. It is strongly recommended to conduct thorough self-testing before the joint SIT test with Keeta.
UAT (User Acceptance Test) Phase
Schedule UAT Test
Conduct UAT Test (Pilot store test)
After passing the SIT test, we will coordinate with a common customer (restaurant) and schedule the UAT test (you can also recommend one to us).
Before the test, notify the responsible person of the customer's restaurant to ensure support for the test. The Keeta team will place and pay for orders in the actual store to verify that the software system functions properly (such as menu management, order management, KDS, receipt printing).
Please note that during the UAT testing phase, you must use the production environment application (which Keeta will assign to you after passing SIT testing) to access Keeta.
Test applications used during the development phase will not have access to merchant data.
Recommendation
Operational Meeting
We recommend that both parties' operational teams hold an operation meeting after the system integration is completed to discuss the subsequent merchant activation/authorization process and align on daily operation and technical issue handling mechanisms.
In addition, based on your developer account, Keeta can provide operation accounts upon request. This accounts allow you to view and manage merchants that have authorized your applications on the Dev Portal.
All API endpoints (except Get Access Token itself) require authentication. Therefore, you must first obtain an access token by calling the Get Access Token endpoint before making any further requests.
After obtaining the access token, you can register the mapping between your internal
merchantIdand theKeeta merchantId, and configure webhook endpoints by calling the Merchant Onboarding endpoint.Once the store mapping has been successfully configured, refer to the Keeta Test App to place a test order for the configured store and proceed to the Order Module testing phase.
At this stage, whenever a new order is placed from the registered store, you will receive a
PLACEDevent via webhook or polling.Upon receiving a
PLACEDevent, you should first retrieve order details, and then either confirm or cancel the order.Once the order is prepared, you must either mark it as ready or dispatch it — depending on whether the delivery will be fulfilled by the merchant or a third-party logistics provider.
✅ Good job! Your app is now ready to receive and process orders. For more advanced features, please refer to the relevant sections of this documentation.
PARAMETERS IN THE SOFTWARE SERVICE (SOFTWARE SERVICE --> Keeta)
{baseURL}
- The {baseURL} is the parameter that indicates the base address, i.e. the constant part of the address, where the routes will be called.
clientId and clientSecret
- Keeta is responsible for providing the credentials for authentication to be performed through the authentication endpoint.
IMPORTANT: As described in the authentication section of the documentation, credentials are generated by Keeta, that is, if several MERCHANTS use the same Software Service, the software will have a same clientId and clientSecret.
- Keeta is responsible for providing the credentials for authentication to be performed through the authentication endpoint.
AppId
- It is the unique ID of Keeta which is generated by Keeta itself, it will be informed to all the Software Services that it will integrate.
X-App-Signature
- Keeta requires Software Service to generate a signature and include it in the header of each API request. Refer to the Signature Calculation section for the complete algorithm specification.
PARAMETERS IN Keeta (Keeta --> SOFTWARE SERVICE)
GET /merchant endpoint URL:
- Keeta must be provided with the URL to access the
GET /merchantroute to obtain the merchant's information.
IMPORTANT: Each merchant that the Software Service works with must have a unique URL.
- Keeta must be provided with the URL to access the
apiKey
- If the GET /merchant endpoint is implemented using authentication, it is necessary that the Software Service provides the apiKey referring to the entered merchant.
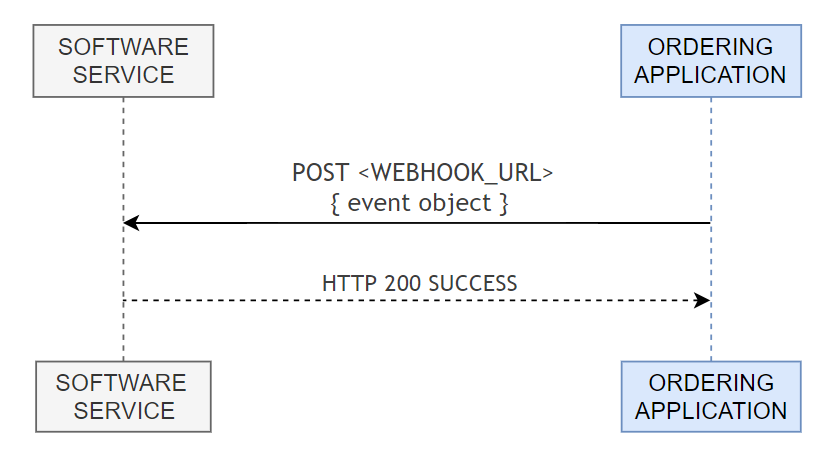
Order Event Webhook
- If both parties are going to work with sending order events via webhook, it is necessary to provide the URL of the webhook. Default webhook route:
POST {baseURL}/newEvent
- If both parties are going to work with sending order events via webhook, it is necessary to provide the URL of the webhook. Default webhook route:
For general guidelines on the Keeta Open Delivery API, please refer directly to Open Delivery General Guidelines.
For error handling guidelines on the Keeta Open Delivery API, please refer directly to Open Delivery Error Handling.
Dev Portal is the developer backend for the Keeta API open platform, comprising two main modules:
1. Application Management
In this module, you can create and manage applications, view application tokens, and check the list of associated merchants. For setting regular webhooks, please use the Open Delivery approach to register and update webhooks(e.g., via the " Register / Update Merchant endpoint info " method). For Merchant authorization updates webhooks, you can directly configure them in the webhook setting page. Please focus only on the webhook configuration for Formal Store. 1301 represents the webhook for new authorization notifications, and 1302 represents the webhook for authorization cancellation notifications.
2. Development Testing Tools
- Store Mapping Check
This tool allows you to view and search all authorized merchant lists and their menu push statuses. To validate the accuracy of store mapping between systems, you can upload the store IDs and coordinates recorded in your system to Keeta. The system will automatically calculate the geographical deviation distance to achieve validation. - Test Store Tool
This tool allows you to create test stores. Please note that you must create an application before proceeding. You can also use this tool to manage the store’s operating status—for example, to reopen a store that was closed due to order failures. After creating a test store, go to Store Details → Edit → Link with your Keeta user account. Be sure to enter the same phone number you used to register as a Keeta user. This will make the test store visible in your app. - Keeta Rider Simulator
To test the full lifecycle of orders, you can use this tool to simulate the entire fulfillment process of a Keeta rider, including rider dispatching, arrival at the restaurant, food pickup, and delivery completion. - Test Order Tool
The Test Order Tool is a convenient web-based utility that allows developers to place test orders at designated test stores, enabling quick validation of the order flow. Alternatively, you may choose to download and use the Keeta Test App to browse store menus and place test orders directly.
You can create a test store yourself in the Dev Portal (see Keeta Developer Portal for details), or use the test store assigned to you by Keeta. Using the account and password of the test store to log into the Keeta Merchant Management System , you will have access to all store management functions, including: viewing orders, viewing historical data, setting store operating hours and status, viewing and editing menus, and setting up promotion activities etc.
Menu Management
If you do not integrate with Keeta's Menu API (i.e., do not manage and publish menus via the API), you can edit and upload menus in the Merchant Management System for testing purposes. If needed, Please use the menu upload template (including PDV Code) to help quickly batch upload full menu and the corresponding external codes. Please contact Keeta team for details and support if needed.
Please note:
If the menu is not integrated, manual entry is required — and it's important to ensure the PDV Code is entered correctly.
However, if menu synchronization is performed via API, Keeta will automatically disable manual entry and modification through the Merchant Management System to prevent data inconsistencies and potential order failures.
If a merchant needs to make manual adjustments to the menu despite API integration, please contact the Keeta API team for support.
Promotion Settings
We recommend setting up various types of marketing activities and placing test orders in the test store to ensure that promotional information in the orders is processed correctly.
Additionally, if you wish to test scenarios involving Keeta platform subsidies, please contact the Keeta API team. We will add Keeta platform promotional items to your test store for this purpose.
Please note that in the SIT testing environment (homologation), we will test scenarios involving both merchant subsidies and platform subsidies to ensure the orders are processed correctly and the promotional information is accurately parsed.
To place orders for test stores, there are two available methods:
Developer Portal with Test Order Tool:
Log into the Dev Portal and use the Test Order Tool to directly place orders at the test store. This method is convenient and allows for rapid validation of order flow, but its functionality is limited.
Keeta Test App:
Download and use the Keeta Test App to browse the store menu and place orders directly within the app. This approach enables a full end-to-end simulation from the user perspective, provides a visualized menu interface, and allows you to trigger refund operations—making it essential for testing reverse order flows and other features.
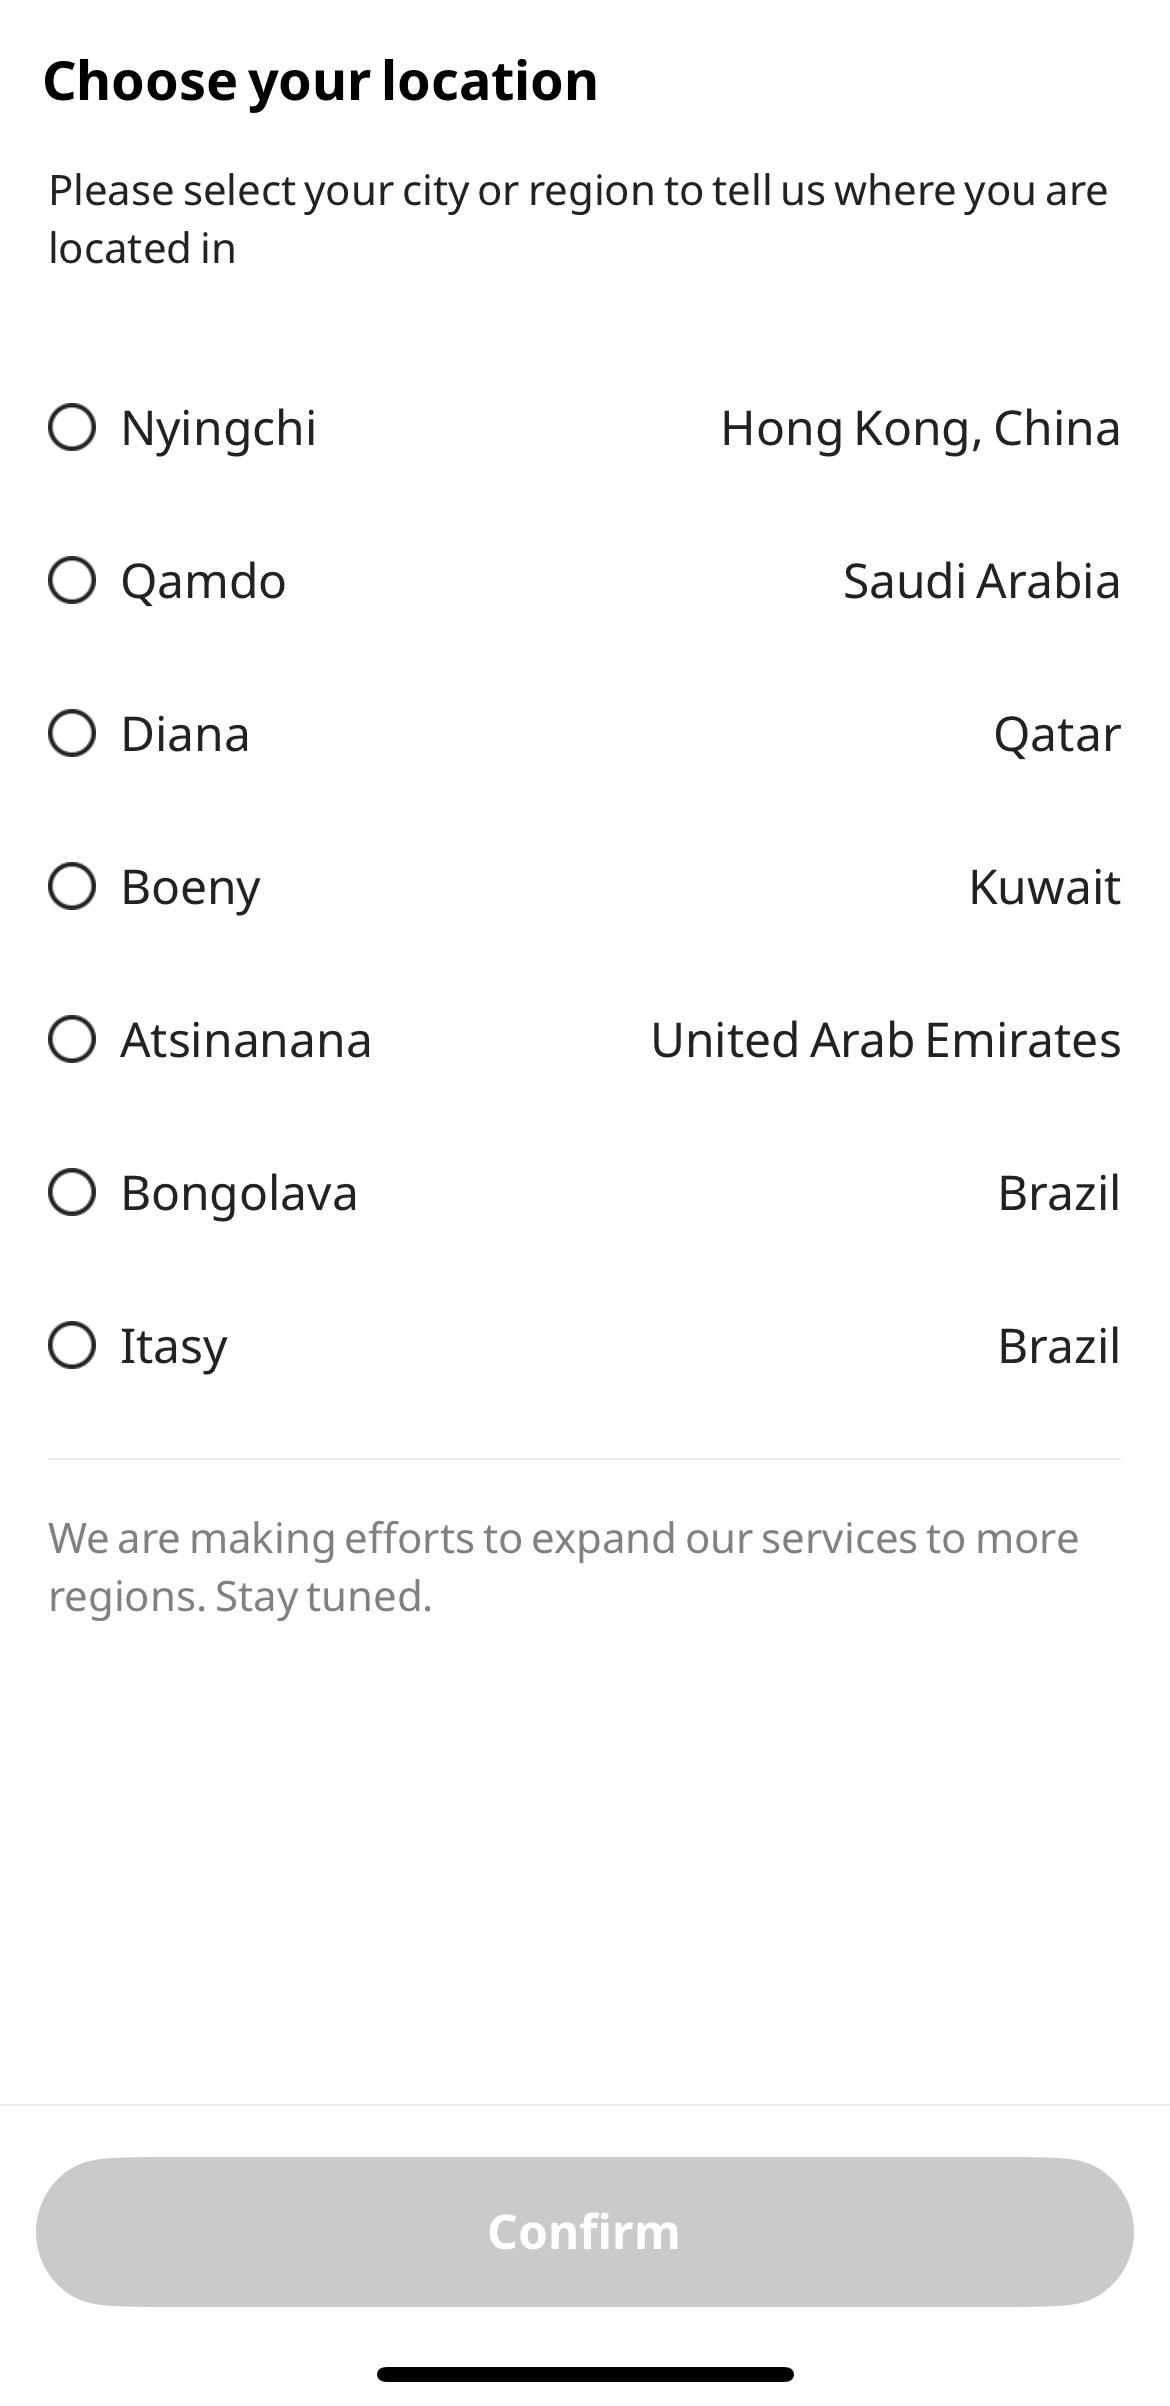
Keeta team will share the download link for the Test APP (available for both Android and iOS versions). Please download and install the app, then select the Bongolava region (as shown in the image below), and complete the user registration (Brazilian phone numbers are supported).
Test Store Registration and Location Settings
After registration, please inform Keeta of your registered phone number and the test store ID you previously created via the link. The Keeta team will bind the two for you to place test orders. After this you will be able to see the test store in the Home page and place test orders with mocked payment.
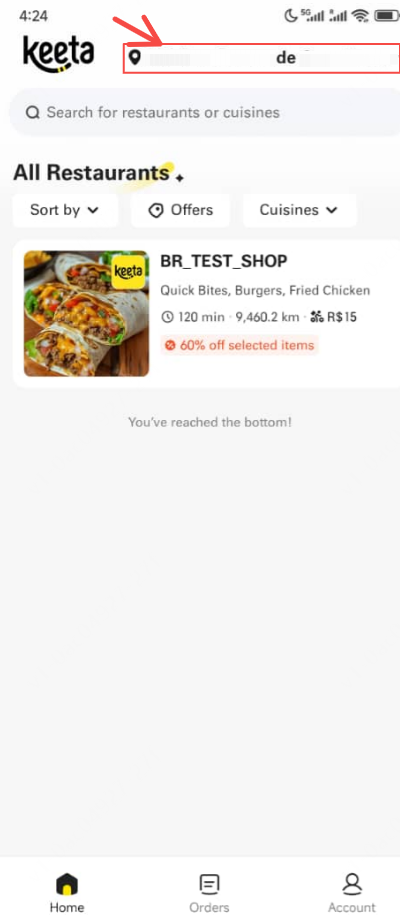
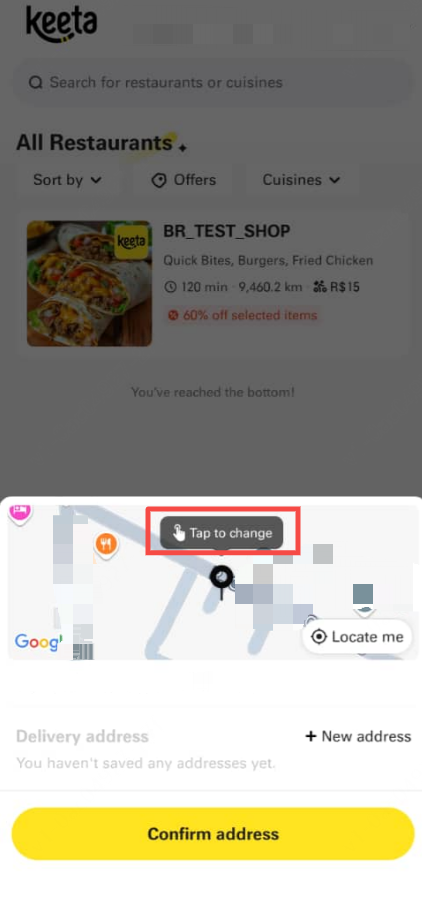
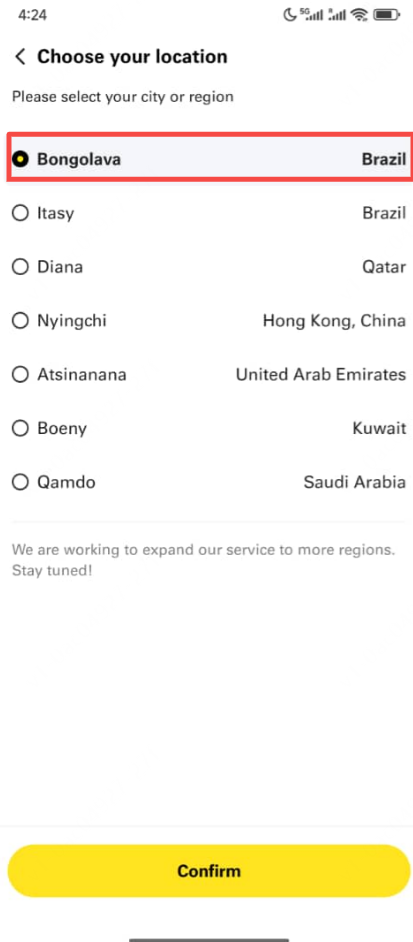
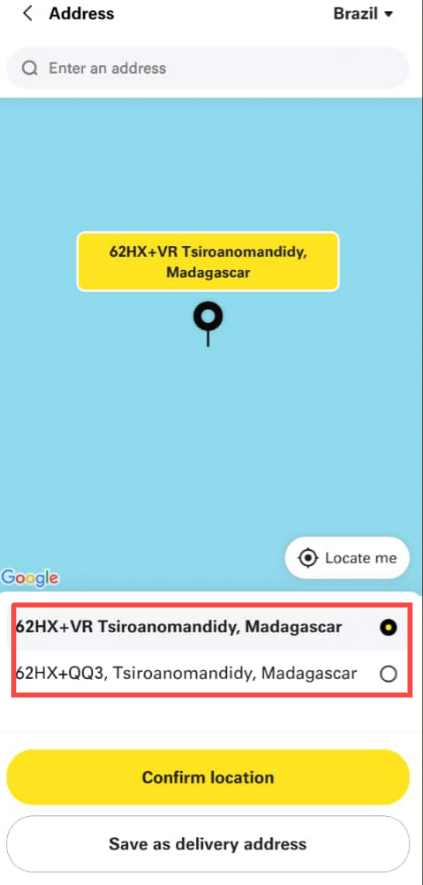
Note: Keeta's test stores are located in the Bongolava region of Madagascar. Please ensure that the delivery address for the test order is near the test store.
If your test store cannot accept orders and displays “Out of Delivery Area,” please switch your current location to a nearby point within the designated testing region.
To update your location:
- Tap the address in the top-right corner of the screen.
- Select “Tap to Change.”
- Tap the top-right region selector (e.g., “Brasil”).
- Choose the first option: “Bongolava”, then tap “Confirm.”
- Select any available location point within the region and tap “Confirm Location.”
Once your location is updated, you will be within the testing area and can place orders at the designated test store.

This document describes the HMAC-SHA256 signature calculation process used for API authentication. The signature is generated by combining the request URL, query parameters, and request body into a signature string, then computing an HMAC-SHA256 hash using a secret key.
Algorithm: HMAC-SHA256
Encoding: Base64
Signature Header: X-App-Signature
- URL: Extract the base URL (without query parameters)
- Query Parameters: Extract all enabled query parameters
- Request Body: Process the request body content
The signature string is constructed by concatenating the following components with & as separator:
signature_string = URL + "&" + sorted_query_params + "&" + request_body- Use the base URL without query parameters
- Example:
https://api.example.com/v1/orders
- Extract all enabled query parameters
- Sort parameters by key name (alphabetical order)
- Format each parameter as
key=value - Join multiple parameters with
& - Handle null/undefined values as empty strings
Example:
Original parameters: {c: "3", a: "1", b: "2"}
Sorted result: a=1&b=2&c=3- JSON Format: Use JSON string directly
- Null Value Handling: Empty objects
{}or empty strings will be skipped - Type Conversion: Non-string types will be converted to JSON strings
- Use the constructed signature string as the message
- Use the provided secret key
- Calculate HMAC-SHA256 hash
- Encode the result in Base64 format
Request:
URL: https://api.example.com/v1/users
Query Parameters: {page: "2", limit: "10", sort: "name"}
Body: (empty)
Signature String:
https://api.example.com/v1/users&limit=10&page=2&sort=nameRequest:
URL: https://api.example.com/v1/orders
Query Parameters: (empty)
Body: {"userId": 123, "productId": 456, "quantity": 2}
Signature String:
https://api.example.com/v1/orders&{"userId":123,"productId":456,"quantity":2}Request:
URL: https://api.example.com/v1/products
Query Parameters: {version: "v2", format: "json"}
Body: {"name": "Product A", "price": 99.99}
Signature String:
https://api.example.com/v1/products&format=json&version=v2&{"name":"Product A","price":99.99}- Below is a complete calculation script example of the signature (JAVA). You can refer to it to implement the signature calculation script of your development language.
import org.apache.commons.lang.StringUtils;
import javax.crypto.Mac;
import javax.crypto.spec.SecretKeySpec;
import java.nio.charset.StandardCharsets;
import java.security.InvalidKeyException;
import java.security.NoSuchAlgorithmException;
import java.util.Base64;
import java.util.Map;
import java.util.TreeMap;

public class SignatureUtils {

    /**
    * generate signature
    * @param url: request url
    * @param queryParamMap: request query parameters Map Structure
    * @param bodyJSONString: request body JSON String
    * @param clientSecret: client secret
    * @return
    */
    public String generateSignature(String url, Map<String, Object> queryParamMap, String bodyJSONString, String clientSecret) {
        StringBuilder sb = new StringBuilder();
        // step 1: concat url
        sb.append(url);
        // step 2: concat query parameters
        if (!queryParamMap.isEmpty()) {
            // 2.1: sort by alphabetical order
            TreeMap<String, Object> sortedParams = new TreeMap<>(queryParamMap);
            // 2.2: concat key and value
            for (Map.Entry<String, Object> entry : sortedParams.entrySet()) {
                String key = entry.getKey();
                String value = entry.getValue() != null ? entry.getValue().toString() : null;
                sb.append("&");
                sb.append(key + "=" + value);
            }
        }
        // step 3: concat body
        if (StringUtils.isNotBlank(bodyJSONString)) {
            sb.append("&");
            sb.append(bodyJSONString);
        }
        // step 4: got a complete string waiting to generate a signature
        String signatureString = sb.toString();
        try {
            // step 5: initialize the HmacSHA256 algorithm with the clientSecret
            Mac mac = Mac.getInstance("HmacSHA256");
            mac.init(new SecretKeySpec(clientSecret.getBytes(StandardCharsets.UTF_8), "HmacSHA256"));
            // step 6: calculate signature
            byte[] bytes = mac.doFinal(signatureString.getBytes(StandardCharsets.UTF_8));
            // step 7: encode the signature in Base64 format
            String signature = new String(Base64.getEncoder().encode(bytes), StandardCharsets.UTF_8);
            return signature;
        }catch (NoSuchAlgorithmException e){
            throw new IllegalStateException("Algorithm HmacSHA256 does not exist.", e);
        }catch (InvalidKeyException e){
            throw new RuntimeException("Key is invalid.", e);
        }
    }
}
Before accessing merchant data, service providers must obtain authorization from merchants. Within the Keeta platform, it is recommended to use Merchant Self-Authorization to automate and streamline this process.
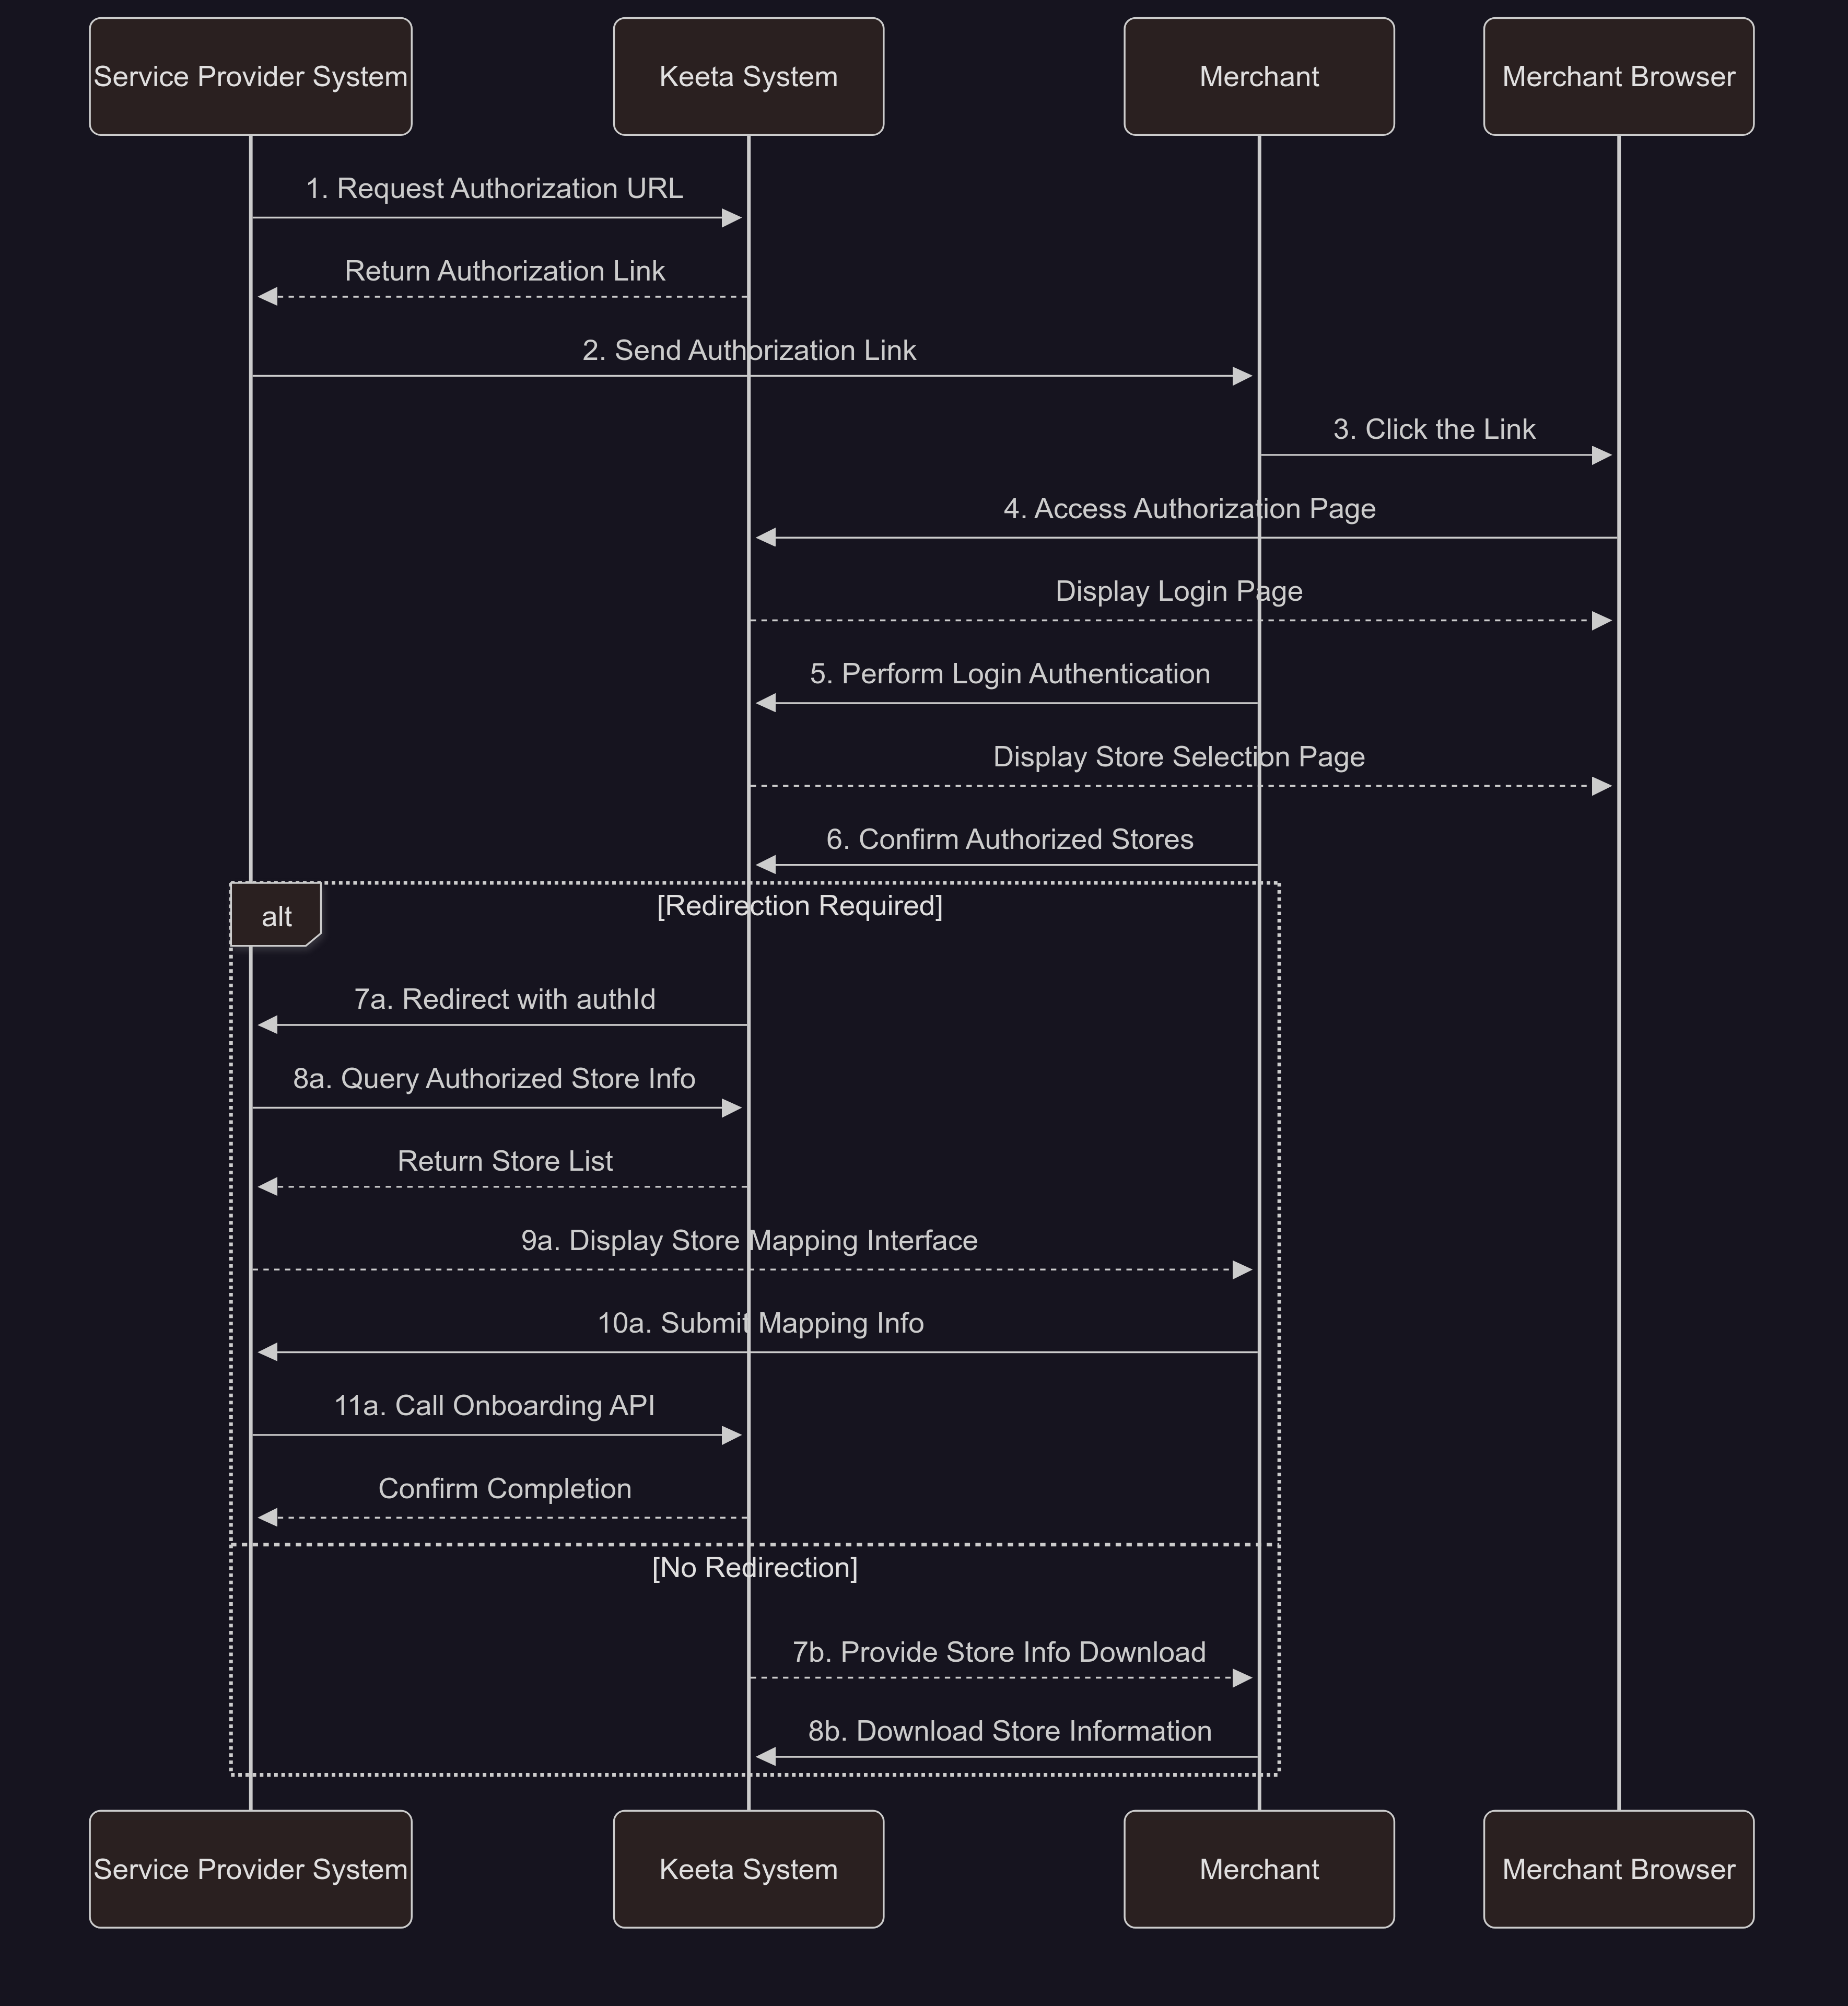
Step 1: Retrieve Authorization Link
- Initiate Request: The service provider system calls the Keeta API to retrieve the authorization URL.
Note: If API integration is not available, the URL can be manually acquired via the Add Authorization button on the Dev Portal.
- Generate Link: Keeta returns an authorization link containing the required parameters.
- Distribute Link: The service provider shares the link with the target merchant to begin the authorization flow.
Step 2: Merchant Authorization Operation
- Access Authorization Page: The merchant clicks the link, redirecting their browser to the Keeta authorization page.
- Authentication: The merchant logs in via Keeta, using either a Brand Account or a Store Account.
- Store Selection: The system displays the merchant’s store list.
- Brand account users must select the store scope to authorize.
- Store account users will proceed without additional selection.
Step 3: Post-Authorization Handling (Two Modes)
Mode A: Redirect Integration (Automated Workflow)
- Automatic Redirect: After authorization, Keeta redirects to the service provider system with the authId.
- Fetch Store Info: The service provider calls the API to retrieve detailed store information.
- Store Mapping UI: The service provider displays a mapping interface for the merchant to match their stores with the service provider’s system.
- Integration Complete: Upon confirmation, the service provider registers store data via the onboarding API.
Mode B: Manual Mapping via Authorization Records
- Merchant-side Download: After authorization, the Keeta merchant management system automatically downloads a spreadsheet of the authorized stores. Alternatively, merchants may manually download the store list to assist with mapping. To explore detailed functionality and operations, please log in to the merchant portal using a test store account.
- Email Notification to Service Provider: Keeta sends the authorized store list to the merchant operations email provided by the service provider for reference and mapping.
- View in Dev Portal: Service providers can log into the Dev Portal and use the Mapping Check feature to search for authorized store records and maintain mappings manually.
Version[1.0.6] - Sep 2, 2025
- Added
DeliveredandSend Delivery UpdatesAPIs related to "Merchant Responsible Delivery".
Version[1.0.5] - Jul 25, 2025
- Added Integrating with the Keeta API.
- Added Postman Collection.
Version[1.0.4] - Jul 18, 2025
ORDERS changes
- Added the post
/v1/batchDecryptendpoint.
Version[1.0.3] - Jul 8, 2025
ORDERS changes
- Added the post
/v1/orders/{orderId}/dispatchendpoint. request validation only.
Version[1.0.2] - Jul 7, 2025
MERCHANT changes
- Removed the post
/v1/merchantStatus/{merchantId}/availableandpost /v1/merchantStatus/{merchantId}/unavailableendpoints, and unified the merchant status update through thePOST /merchantUpdateendpoint (consistent with the native Open Delivery protocol).
Version[1.0.1] - Jun 30, 2025
Response Body Structure Definition Change
- Version 1.0.0 introduced response body structural changes, while v1.0.1 was adjusted to maintain alignment with the Open Delivery.
ORDERS changes
- Updated order events diagram and order flow diagram in Order Overview section.
- Added Order Refund instruction under Order Overview which follows Keeta's refund rules.
- Added sample metadata for payload within
USER_REFUND_REQUESTevent that could be notified by polling or webhook mechanism.
MERCHANT changes
- The data structure and fields of
GET /merchantandPOST /merchantUpdateendpoints are adjusted to be consistent with the native Open Delivery protocol.
https://open.mykeeta.com/api/open/opendelivery/
└────► Merchant Endpoint
This section details the GET /v1/merchant endpoint.
This endpoint should be implemented by the Software Service and its URL should be informed to Keeta.
The endpoint is designed so that each merchant has its own URL.
The specification recommends that the endpoint ends with the /merchant route, but this is not mandatory. The Software Service can implement the URL in any way it sees fit, as long as it contains information from only one merchant.
└─● ORDERS
This overview summarizes the Ordering flow and how it interacts with merchant Software Service and Keeta.
Order Events State Machine

Understanding the Order Flow

The order flow has the following Macro steps:
1. Order Event Reception
Through Order Events, Keeta communicates to the Software Service the existence of a new order, as well as the other events of the order lifecycle.
Open Delivery provides two ways for merchant Software Service to be aware of new events:
Polling: Receiving events through polling provided by Keeta is the common way Open Delivery Order Events works.
Webhook: Optionally it is recommended the implementation of a webhook by the merchant Software Service for the Keetas to send new events directly, ensuring a much faster communication.
2. Order Details
Before confirming or canceling an order, it is necessary to get the order details so that the merchant Software Service user can check if he will be able to prepare and deliver this order, such as checking if he has all the necessary items and if he is available to make the delivery to the informed address.
Through the GET /orders/{id} endpoint the merchant Software Service can get all the details of an order.
This endpoint returns the code 200 and the content of the request. If an invalid request id is entered the endpoint returns 404.
Regarding order detail information, the following additional clarification is provided to prevent user information leakage:
Keeta will return encrypted data with the
ENC_prefix when returning users' personal privacy data(as customer, delivery). Software Services can call the POST /v1/batchDecrypt endpoint to decrypt the data. Please note that data can only be decrypted in merchant self-delivery or third-party logistics (3PL) delivery scenarios. For Keeta platform-delivery orders (full service), the data cannot be decrypted.
3. Order Events Updates
Following the order lifecycle, the merchant Software Service needs to notify Keeta of the upcoming order status.After acknowledging receipt of a new order event (either via polling or webhook) is expected that the Software Service explicitly POST /orders/{orderId}/confirm or POST /orders/{orderId}/requestCancellation within a time window set by Keeta. Otherwise the order can time out and auto-cancel and the merchant can suffer a penalty based on Keeta policy.
Order acceptances should be posted as quickly as possible to minimize consumer cancellations.
When the order is ready, it is expected that a request will be sent to POST /orders/{orderId}/readyForPickup
When sending requests to these endpoints, is expected that Keeta notifies the consumer of the progress of the order.
4. Order Cancellation
An order can be canceled for several reasons and the initiative to cancel an order can come from the merchant, the customer, or Keeta. It may also happen that the delivery person requests the cancellation in some scenarios, such as when the customer is not found at the delivery address.Cancellation Rules
It is expected that both Keeta and merchant Software Service have their own order cancellation policies and inform their users.
A cancellation request must always contain:
- reason: Open text field indicating the reason for the cancellation.
- code: An enumerator containing a cancellation reason.
- mode: Field indicating whether the cancellation occurred Automatically or Manually.
The cancellation can be requested by:
Software Service (Merchant):

If the merchant wants to cancel an order, it must make a POST /orders/{orderId}/requestCancellation request.
Penalties
Avoid order cancellations! Excessive cancellations can result in some penalties (depending on Keeta's policy) such as having the merchant temporarily closed on the platform.
Cancellation Validation
The Cancellation request does not guarantee that the order is cancelled. When sending a request /orders/{orderId}/requestCancellation, Keeta will send the code 202 (accepted) in response. This does not yet mean that the request has been cancelled. It means that the request has been accepted and will be processed by Keeta cancellation service. As a result of this request, the merchant Software Service may receive at the next polling (or via webhook) one of the following events:
- CANCELLED
The order should only be Canceled when the CANCELLED event is generated.
Cancellation rules may vary depending on the timing of the order (before or after confirmation). In some situations it is possible that Keeta cancellation service will consult with the consumer on whether or not the consumer accepts the cancellation of the order.
Cancellation codes:

- INSUFFICIENT_DISHES
- SUSPENSION_OF_BUSINESS
- INSUFFICIENT_MANPOWER
- OTHERS
Cancellation by Keeta can happen by:
code: CONSUMER_CANCELLATION_REQUESTEDThe consumer can request the cancellation of an order. Depending on the cancellation rules applied, this option may not be enabled for all merchants. It may also only be allowed at certain times, such as before the order is confirmed.
code: OTHER_CANCELLATION_REASONKeetas may cancel the order for reasons other than via customer. Possible reasons for order cancellation by the system include: timing out without acceptance, no rider accepting the order, or the rider reporting the store as closed.
When the Order Application initiates a cancellation, an order cancellation event is transmitted to the Software Service via webhook or polling. The Software Service must then update the order status based on the event details.
5. Order Refund
Users can initiate a fully order refund or a partial item refund request from the Order Application, which will trigger the `USER_REFUND_REQUEST` event to be sent to the Software Service. This event will include details such as the refunded items and pricing information. The refund process follows a handshake protocol: if the merchant agrees to the refund request, they need to call the Agree Refund API; if they disagree, they should call the Reject Refund API.
Sample metadata within USER_REFUND_REQUEST event, refer to polling API and webhook.
{
  "money": 8500,
  "opTime": 1751005551823,
  "shopId": "461827",
  "status": 5002,
  "currency": "HKD",
  "isAppeal": 0,
  "partRefund": 0,
  "applyOpType": 10,
  "applyReason": "Wrong Order",
  "orderViewId": 783441058793308,
  "handleOpType": 20,
  "handleReason": "Merchant Agreed to Refund",
  "refundProducts": [
      {
          "id": 12053105,
          "name": "1️⃣  Noodles with 1 Topping",
          "spec": "",
          "tags": [],
          "count": 1,
          "price": 7500,
          "skuId": 8949938,
          "spuId": 9897081,
          "groups": [
              {
                  "groupId": 4305174,
                  "groupName": "Choose Your Choices of Noodles",
                  "groupNameI18n": {
                      "en": "Choose Your Choices of Noodles",
                      "zh-HK": "選擇麵底",
                      "default": "選擇麵底"
                  },
                  "groupOpenItemCode": "cgp-7741|1-1",
                  "shopProductGroupSkuList": [
                      {
                          "count": 1,
                          "price": 0,
                          "spuId": 2069967,
                          "spuName": "Rice Stick Noodle Supremes",
                          "currency": "HKD",
                          "spuPvList": [],
                          "groupSkuId": 23903426,
                          "refundCount": 0,
                          "refundPrice": 0,
                          "spuNameI18n": {
                              "en": "Rice Stick Noodle Supremes",
                              "zh-HK": "米線",
                              "default": "米線"
                          },
                          "groupSkuOpenItemCode": "128019"
                      }
                  ]
              }
          ],
          "remark": "",
          "picList": [
              "http://img-ap-hongkong.mykeeta.net/sailorproduct/aa2d5209534619f31c2e966080ecac5885942.jpg"
          ],
          "currency": "HKD",
          "nameI18n": {
              "en": "1️⃣  Noodles with 1 Topping",
              "zh-HK": "1️⃣  單拼小窩米線",
              "default": "1️⃣  單拼小窩米線"
          },
          "priceStr": "$75.00",
          "spuPvList": [],
          "promotions": [],
          "refundType": 1,
          "originPrice": 7500,
          "refundCount": 1,
          "refundPrice": 0,
          "orderProductId": 359379560,
          "originPriceStr": "$75.00",
          "priceWithGroup": {
              "amount": 7500,
              "amountStr": "$75.00",
              "originAmount": 7500,
              "originAmountStr": "$75.00"
          },
          "skuOpenItemCode": "AY290105",
          "spuOpenItemCode": "8898",
          "priceWithoutGroup": {
              "amount": 5900,
              "amountStr": "$59.00",
              "originAmount": 5900,
              "originAmountStr": "$59.00"
          }
      }
  ],
  "partRefundCount": 0,
  "afterSaleOrderId": 783440453161676
}
Reverse Transaction Policy
The reverse transaction flow includes two scenarios: Cancellation Requests and Refund Requests, initiated by four possible parties:- User
- Merchant
- Keeta Customer Support
- Keeta System
| User | Merchant | Customer Service | System | |
|---|---|---|---|---|
| Cancellation | Full Service: Users can only cancel order before merchants accpet (confirm) the order, without merchants' approval. | After a user successfully places an order, the merchant has the option to proactively cancel the order at any time within 48 hours after the order is completed. Merchants can choose to initiate order cancellations through the Software Services system, or alternatively, log into the Keeta Order Management System to cancel orders. For the latter option, Keeta will send an order cancellation notification to Software Services via API. | If an order cancellation request is escalated to Keeta Customer Support, the support team may cancel the order at any time—up to 30 days after the order is completed. Therefore, if an order is cancelled by Customer Support (even after order completion), the cancellation event will be notified to Software Services | If an order is not accepted within five minutes, the system will automatically cancel the order. Merchant approval is not required for this cancellation. ⚠️ Important: Failure to accept an order within five minutes will result in the temporary closure of the store. |
| Refund | After a user submits a refund request, an event notification will be triggered, and merchant approval is required. Regardless of whether the software integrates the deny refund or approve refund API, merchants can always log in to the Keeta Merchant Portal to communicate with users and manage disputes via Instant Messenger. No matter which method the merchant uses to process the refund request—either through the Keeta Merchant Portal or via software capabilities—the outcome is idempotent. Both workflows can operate in parallel, and the final result will be determined by whichever response is received first | Merchants are not able to initiate refund requests via API. | Same as above | N/A |
In summary, Keeta may initiate order refund or cancellation notifications at any point in time. Software Services should handle these order status updates based on its own operational needs — either by aligning with Keeta’s order status, or, by ignoring the notifications to preserve the integrity of its internal system state.
If you prefer not to have your internal order status changed by Keeta under certain conditions (e.g., after an order is accepted or after completion), please discard Keeta’s order status notifications to ensure your system’s order status remains unaffected.
If this results in reconciliation issues for the merchant, they should contact Keeta’s Business Development (BD) team to resolve the matter.